Get a Head Start on Spring by Learning When to Start Seeds Indoors
As we cozy up indoors during the winter months, our minds inevitably start drifting toward the warmer days of spring and the promise of a vibrant garden. That’s why today we’re diving into the world of seed starting by learning when to start seeds indoors.
Starting seeds indoors is like giving your plants a backstage pass to the main event — it’s where the magic begins! But, of course, timing is everything in gardening.
Whether you’re a seasoned pro or just getting your hands dirty for the first time, this guide will ensure you’re well-prepared to nurture your little seedlings into robust, flourishing plants. So, let’s roll up our sleeves and embark on the exciting journey of turning tiny seeds into a garden full of life and color!
When to Start Seeds Indoors

To figure out when to start seeds indoors, the key is to count backward from your region’s average last frost date. For most folks, about 6-8 weeks before the last expected frost is the sweet spot.
This gives your seeds ample time to sprout into sturdy seedlings ready to face the great outdoors. A nifty trick is to check out your seed packets — they usually provide guidelines on when to sow indoors.
If you’re unsure of your local frost dates, numerous online tools can help you pinpoint them. Here are a few options:
Remember, it’s not a one-size-fits-all scenario, as climates vary. So, if you’re in a colder zone, you might need to start a tad earlier, while warmer zones can afford a bit of a delay.
Why Should You Start Seeds Indoors?
Picture this: it’s still chilly outside, and your garden is patiently waiting for the warmth of spring. This is precisely when starting seeds indoors becomes your horticultural superpower.
The main reason? Control. When you sow seeds indoors, you take command of the growing conditions, creating a cozy, consistent environment that caters to your plants’ every need.
Timing is the golden ticket here. By starting the germination process indoors, you’re giving your seeds a jump on the season.
This is particularly beneficial for plants that require a longer growing season, like tomatoes, peppers, or certain flowers. If you don’t start these plants early, they either won’t have enough growing days to provide a nice harvest, or you’ll have to buy transplants at your local nursery or garden center, which are more expensive than seeds.
Another compelling reason is protection. Starting seeds indoors shields your delicate seedlings from unpredictable weather, hungry pests, and other outdoor challenges. It’s like giving them a cozy nursery before they venture into the wild world of your garden.
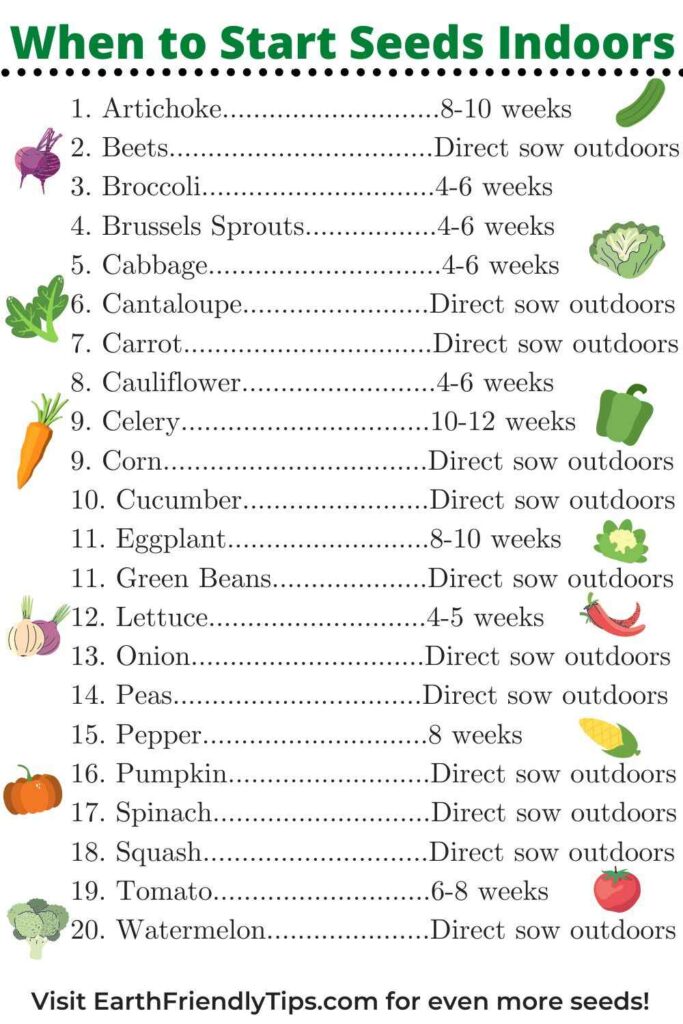
Which Seeds Should You Start Indoors?
Not all seeds need to be started indoors. The rule of thumb is to focus on plants that benefit from a head start.
Tomatoes, peppers, and eggplants are prime examples. These warm-season crops need a longer growing season. By starting them indoors about 6-8 weeks before your region’s last frost date, you’re ensuring they hit the ground running when spring officially arrives.
Herbs, both culinary and aromatic, also make fantastic candidates for indoor starting. Think basil, thyme, and rosemary. These little green wonders appreciate the controlled environment of your home, By the time you transplant them, they’ll be bursting with flavor and fragrance.
On the other hand, fast-growing vegetable plants like radishes and green beans will start to sprout and produce so quickly that there’s no need to start them indoors. They can go straight in the ground whenever you’re ready to grow them.
Additionally, root vegetables such as carrots, beets, and turnips don’t like having their roots disturbed. It’s better to plant them directly in the ground after the threat of frost has passed so they can begin growing down into the dirt like they need to.
Using Soil Temperature to Time Seed Starting
While it’s pretty easy to find your last frost date and count the days on your calendar, this isn’t always the most accurate way to determine when to start your seeds. This is based on average frost dates, and these dates can shift from year to year.
Seeds are pretty picky about the conditions they sprout in, and soil temperature plays a pivotal role in their germination success. Unlike air temperature, which can fluctuate wildly, the soil tends to be more consistent.
That’s why using a soil thermometer can give you a more accurate idea of when your seeds will be comfortable enough to start growing.
Different plant varieties have their sweet spots when it comes to soil warmth. For instance, warm-season crops like tomatoes and peppers prefer a cozier soil temperature to start their germination process. By relying on the soil temperature, you’re essentially customizing your approach based on the specific needs of your seeds.
The following chart can give you a good idea of what soil temperature to look for when starting your plants. However, as always, it’s best to refer to your seed packets to find a more specific number since different varieties of the same plant can have different needs.
| Crop | Min. Temp (°F/C) | Ideal Temp (°F/C) | Max. Temp (°F/C) |
| Beans | 60°/16° | 60-85°/16-29° | 95°/35° |
| Beet | 40°/4° | 50-85°/10-29 | 85°/29° |
| Cabbage | 40°/4° | 45-95°/7-35° | 85/29° |
| Carrot | 40°/4° | 45-85°/7-29° | 95°/35° |
| Celery | 40°/4° | 60-70°/16-21° | 85°/29° |
| Corn | 50°/10° | 60-95°/16-35° | 105°/41° |
| Cucumber | 60°/16° | 60-95°/16-35° | 105°/41° |
| Eggplant | 60°/16° | 75-90°/24-32° | 95°/35° |
| Lettuce | 35°/2° | 40-80°/4-27° | 85°/29° |
| Melon | 60°/16° | 75-90°/21-35° | 100°/38° |
| Onion | 35°/2° | 50-95°/10-35° | 95°/35° |
| Parsnip | 35°/2° | 50-70°/10-21° | 85°/29° |
| Pea | 40°/4° | 40-75°/7-24° | 85°/29° |
| Peppers | 60°/16° | 65-95°/18-35° | 95°/35° |
| Spinach | 35°/2° | 45-75°/7-24° | 85°/29° |
| Squash | 60°/16° | 65-95°/18-35° | 100°/38° |
| Swiss chard | 40°/4° | 50-85°/10-29° | 95°/35° |
| Tomato | 50°/10° | 70-95°/21-35° | 95°/35° |
| Turnip | 40°/4° | 60-100°/16-38° | 105°/41° |
How to Start Your Seeds

You’ve circled the magic date you can start seeds indoors on your calendar, and the day is finally here. Now, it’s time to gather your supplies and follow these simple steps to get growing.
Step 1: Gather Your Supplies
First things first, assemble your seed-starting arsenal. You’ll need seed trays or containers, a good-quality seed starting mix, seeds of your choice, labels to keep everything organized, a source of light, and a way to water your seeds.
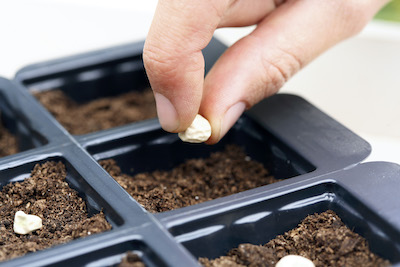
Step 2: Choose Your Containers
There are a variety of containers you can use to start your seeds. You can reuse small containers you might have kept from any seedlings you have purchased in the past.
You can also repurpose food containers such as yogurt cups or sour cream containers. Simply clean them out and poke a few holes in the bottom for drainage.
You can purchase biodegradable seed pots, or you can make your own DIY seed pots using toilet paper rolls.
Plug trays are a very convenient option and what I personally use to start my seeds. These flat trays have individual cells for each seed. Simply fill the cells with potting mix, pop in the seeds, and grow them until it’s time to transplant into bigger pots or into your garden.
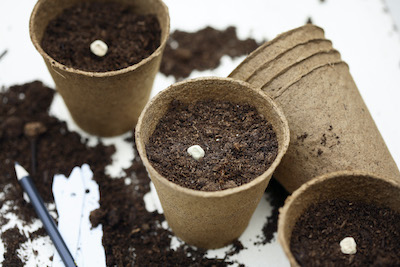
Step 3: Prep Your Soil Mix
Create a cozy home for your seeds by using a well-draining seed starting mix. Fill your containers with potting mix and then tamp it down so it can settle. Finally, top off your containers will a little more mix.
Your seedlings need a lot of soil to sustain them as they’re growing, so don’t be afraid to put in as much as the containers will hold.
Use your finger or a dibber to make a planting hole in the potting mix. Be sure to reference the seed packet to see what depth you need to plant your seeds at. If your seeds are too shallow or too deep, they won’t get the proper amount of light to germinate.
Once you’re done sowing, cover the seeds with potting mix.
Step 4: Label Your Containers
This is a very important step that you don’t want to forget! A lot of gardeners think they’ll remember what they planted, but it’s very easy to forget and get confused, especially if you’re growing different varieties of the same type of plant.
In addition to noting the variety of plant seed you’ve sown, be sure to write down the date. If a plant is taking too long to sprout, you might have some old or bad seeds that will never germinate.
Step 5: Provide Optimal Conditions
Place your trays in a warm, well-lit spot. If you don’t have a suitable protected outdoor structure, such as a greenhouse, you might need to invest in some full-spectrum grow lights.
Position the lights about 4 to 6 inches above the seedlings. That’s far enough to provide good, strong light without making things too warm. You can then move the lights up as the plants grow and need more space.
Keep in mind that plants do need some darkness to grow, so don’t leave your grow lights on 24/7. Instead, aim for about 16 hours of light each day.
Maintain a consistent temperature, as most seeds prefer a cozy 70-75°F (21-24°C) environment for germination.
Step 6: Water Wisely
Keep your soil consistently moist but not waterlogged. A light misting with a spray bottle is ideal until your seedlings emerge. Once they do, water from the bottom to encourage strong root development.
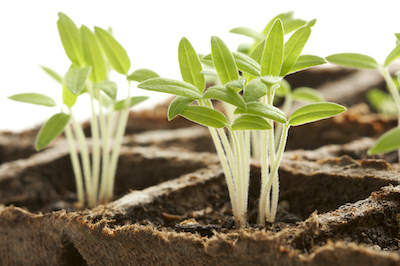
Step 7: Be Patient and Watch for Sprouts
Now it’s time for the waiting game! Depending on the seeds, germination can take anywhere from a few days to a few weeks. Keep a watchful eye, and celebrate the glorious moment when those little green heads pop up.
Harden Off Seedlings Before Planting Them Outdoors

There’s one more crucial step in the journey from starting seeds indoors to planting them outside — the process of hardening off. Suddenly moving your plants from a stable indoor environment to an outdoor environment that has wild variations in light, temperature, and wind can weaken or even kill them.
You can follow these steps to harden off your seedlings and get them ready for your outdoor garden.
Step 1: Pick the Right Time
Before you rush your seedlings outdoors, check the weather forecast. Aim for a stretch of mild, overcast days so your plants can start with a gentle transition. Avoid scorching sun or frosty nights, as these can be a bit much for your indoor seedlings.
Step 2: Gradual Exposure
Start slow. On day one, give your seedlings a taste of the great outdoors by placing them in a shaded, sheltered spot for just an hour or two. Gradually increase this time over the course of a week or two. This gradual exposure helps toughen up those pampered leaves and stems.
Step 3: Adjust Light and Wind
As your seedlings get acclimated, gradually expose them to more sunlight and a bit of wind. This mimics the outdoor conditions they’ll face once planted. Just be mindful not to subject them to harsh, scorching winds right away — it’s all about building their resilience step by step.
Step 4: Watch for Stress Signals
Keep a close eye on your seedlings during the hardening off process. If you notice any wilting, yellowing, or other signs of stress, dial it back a bit and give them more time to adjust. Remember, patience is the name of the game.
Step 5: Water and Protect
Outdoor conditions can be a bit more demanding, so adjust your watering schedule accordingly. Wind and sun can speed up moisture loss, so keep the soil consistently moist. Also, be on the lookout for potential pests — a watchful eye now can prevent issues later.
Step 6: Gradual Planting
Once your seedlings have successfully completed the hardening off process, they’re ready for transplanting into your garden. Choose a cloudy day or plant in the late afternoon to minimize stress during the final move.
Everything You Need to Know on When to Start Seeds Indoors
The key to successful indoor seed starting is not just about the timing on the calendar but understanding the unique needs of your seeds. By giving them a head start in the controlled environment of your home, you’re essentially laying the groundwork for a garden that’s vibrant and bursting with life.
As you embark on your indoor gardening escapades, keep in mind the magic of soil temperature, the specific seeds that thrive indoors, and the essential steps to nurture those tiny seeds into robust seedlings.
More Awesome Tips to Help You Grow a Thriving Garden
Did you enjoy learning more about when to start seeds indoors? Are you looking for additional tips that can help you grow an amazing garden? Then please be sure to take a look at some of our other popular posts:


Leave a Reply